

Benefits of connecting Notion to Windmill
Connecting Notion to Windmill ensures planning, documentation, and project work becomes visible in performance conversations — without employees needing to summarize or translate their work manually.- Automatically captures contributions to docs, specs, research, and project planning
- Recognizes the invisible but critical thinking work that often gets missed in reviews
- Reduces the time managers and employees spend preparing for review cycles
- Helps managers coach using real examples of communication, clarity, and collaboration
- Makes performance reviews more fair and grounded in the full scope of someone’s work
Connection types
When connecting Notion to Windmill, you’ll choose between two connection types. The setup flow is the same for both — the difference is who can see the synced data.Account
An account connection is set up on behalf of your organization. Any data synced from this integration is globally available to all Windmill members in your company. This is ideal when your team uses shared Notion workspaces and you want everyone to benefit from the synced context.Personal
A personal connection is tied to an individual. Any data synced from this integration is only visible to you — no one else in your Windmill organization can see it. This is a good option if you want to connect personal Notion pages or private notes without sharing them across your team.Choosing a connection type
Notion Enterprise workspace settings
Some Notion Enterprise workspaces restrict which integrations members can add. Notion calls integrations connections in its settings. If a member sees an error while creating a personal Notion connection in Windmill, the fix is usually in Notion’s Enterprise connection settings.Approving Windmill for members
A Notion workspace owner can approve Windmill for members without making every member a workspace owner.Open Notion connection settings
Check member restrictions
Install Windmill once if needed
Add Windmill to the approved list
Ask members to connect from Windmill
Managing page access in Enterprise workspaces
Notion Enterprise workspace owners can also control who is allowed to connect or disconnect integrations from specific pages. If Windmill is approved but a member still cannot select or share pages, check page access settings in Notion.Open the Windmill connection in Notion
Open page access settings
Choose pages and who can manage them
Setting up the Notion integration
Go to Integrations
Select Notion
Choose your connection type
Approve access in Notion
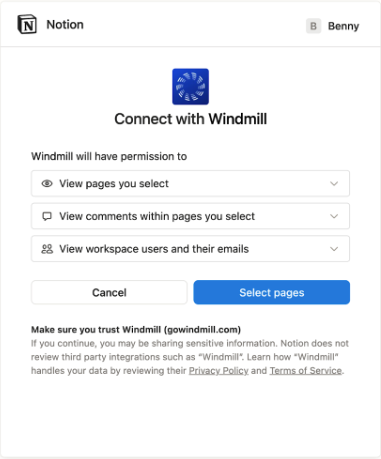
- View pages you select
- View comments within pages you select
- View workspace users and their emails
Choose which pages to share
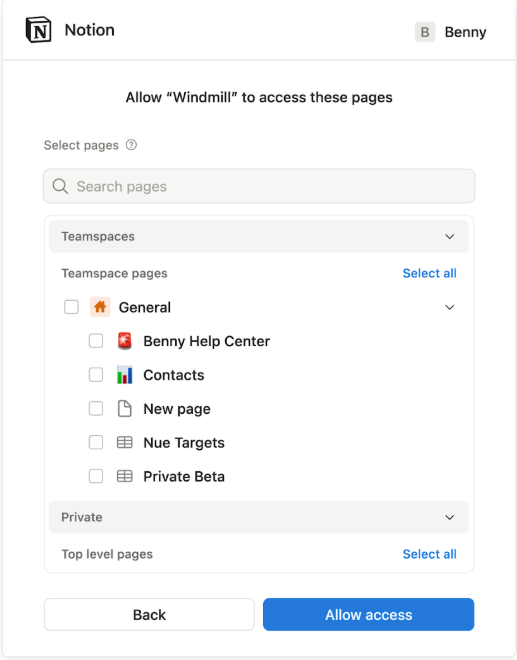
- Browse your Teamspaces and Private sections
- Select all or Deselect all pages at once
- Use the search bar to quickly find specific pages
- Expand folders to include or exclude subpages
How Page Access Works
Windmill’s access to your Notion workspace is a point-in-time selection. When you connect, you choose which pages to share — and from then on, Windmill can only see those pages and the subpages nested inside them. Nothing else in your workspace is visible. This has a few important implications:- New pages aren’t shared automatically. A page you create later won’t sync on its own. The one exception is subpages: a page created inside a page you already shared inherits that access automatically.
- A teamspace doesn’t grow your access. Selecting pages from a teamspace shares the pages that exist at that moment — not the teamspace itself. New top-level pages added to it later won’t sync until you share them.
- Unselected pages stay private. Any page you didn’t select stays invisible to Windmill, even if you have access to it yourself in Notion.
- You stay in control. You can add or remove shared pages at any time — see Managing visibility and access below.
Pages you can share
You can only share a Notion page with Windmill if you have Full access to that page in Notion. This rule applies to both Account and Personal connections. If you do not have Full access to a page:- The page does not show in the Notion page picker when you connect or update access.
- You cannot add Windmill from the page’s ••• menu in Notion.
Managing Visibility and Access
Because access is set when you connect, you’ll need to update it whenever you want Windmill to see more (or fewer) pages. There are two ways to do this.From Windmill
Go to Settings → Integrations → Notion → Manage access. From here, you can:- Reconnect to Notion if access expires
- Reopen the Notion page picker to see which pages are currently selected and add or remove shared pages
- Disconnect the integration entirely
From Notion
You can also share a single page with Windmill directly inside Notion:- Open the page and click the ••• menu in the top-right corner.
- Click Add connections, then select Windmill.
Meeting notes and transcripts
If your Notion pages include AI-generated meeting notes, Windmill pulls in the summary of the meeting on demand when Windy references that page — but not the raw transcript.- Windy can see the meeting title, date, summary, and any notes written on the page
- The full transcript itself is not synced or stored in Windmill
- Meeting notes pulled from Notion are not linked to 1:1s in Windmill
Best practices
- Share only pages relevant to your team’s use of Windmill (e.g., meeting notes, team goals, or planning docs).
- Share a parent page to automatically include the subpages within it. New top-level pages — including ones added to a teamspace later — must be shared manually.
- Use an account connection for shared team workspaces so all members benefit from the context.
- Use a personal connection for private notes or pages you don’t want visible to others.
- Revisit your integration settings if your Notion workspace structure changes.
- Keep sensitive or unrelated pages unselected to maintain privacy and data security.
FAQs
How often does Notion data sync?
How often does Notion data sync?
Can my organization have both account and personal connections at the same time?
Can my organization have both account and personal connections at the same time?
What's the difference between account and personal connections?
What's the difference between account and personal connections?
Who can create each type of connection?
Who can create each type of connection?
A Notion error says a workspace owner needs to install Windmill. What should I do?
A Notion error says a workspace owner needs to install Windmill. What should I do?
Do we need to make every employee a Notion workspace owner?
Do we need to make every employee a Notion workspace owner?
The Notion owner installed Windmill, but members still can't connect. What should we check?
The Notion owner installed Windmill, but members still can't connect. What should we check?
What happens to a personal connection if someone leaves the team?
What happens to a personal connection if someone leaves the team?
Will Windmill automatically see new pages I create in Notion?
Will Windmill automatically see new pages I create in Notion?
Why can't I find a page in the Notion page picker?
Why can't I find a page in the Notion page picker?
How do I see which Notion pages are connected?
How do I see which Notion pages are connected?
How do I stop sharing a page with Windmill?
How do I stop sharing a page with Windmill?